


Easy Warli painting for beginners.
I strongly believe that art is all about painting the imaginings into reality!
I am a self taught artist, for me art is not only a hobby it’s a way of life. Art is therapy for me, it brings peace to my mind when I am stressed. I like and enjoy taking up new art techniques.
Welcome back to Smruti’s Art corner! I am back with my favorite Warli art. I have a huge collection of warli paintings but this is my favorite one. As my base is from Maharashtra, warli art is much close to my heart.
India is known for its diverse cultures from every corner of the subcontinent. Because of this cultural environment, every culture has developed its own uniqueness and formed its own arts and traditions. These arts and traditions become a brand of sorts for that culture. In this huge culture in the Indian subcontinent, there is a tribal art that has emerged to gain credit in the whole wide world. This tribal art is Warli art.
What is warli art?
Warli art is a form of tribal art and is one of the oldest Indian folk art and originated in Maharashtra. Warli art is mostly created by tribal people from the north sahyadri range in Maharashtra, India. Warli paintings are characteristic with their dramatic contrast expressions. The painting is made on a red mud wall with white paint, and this white paint is made from grounding rice into a white powder. These paintings are mainly conquered by basic geometric shapes like circles, triangles and squares.
What is special about warli art?
Warli paintings were mainly done by the women folk. The most important aspect of the painting is that it does not portray mythological characters or images of deities, but represents social life. Pictures of human beings and animals, along with scenes from daily life are created in a loose rhythmic pattern.
Who invented Warli art?
In the 1970s, Warli art took a major turn when Jivya soma Mashe and his son Balu mashe started to paint. There was artistic pursuit behind painting warli art. Jivya is known as the modern father of Warli painting. Since the 1970s, Warli painting has moved on different media such as paper, canvas, wall, fabric etc.
What are the symbols used in Warli art?
These wall paintings use a set of basic geometric shapes: a circle, a triangle, and a square. These shapes are symbolic of different elements of nature. The circle represents the sun and the moon, while the triangle depicts mountains and conical trees. In contrast, the square renders to be a human invention, indicating a sacred enclosure or a piece of land. The central motif in each ritual painting is the square, known as the “chauk” or “chaukat”, mostly of two types known as Devchauk and Lagnachauk. Inside a Devchauk is usually a depiction of palaghat, the mother goddess, symbolizing fraternity.
Themes of the Warli art?
The theme of Warli painting is not mythological but rather activities of daily life like hunting, harvesting, dancing and sowing. Typical subjects on which Warli art is done are:
- Festival
- Harvest
- Folk story
- Celebration
- Marriage.
What are the main colors used in warli painting?
Colors of warli painting background are Henna, indigo, earthy mud, brick red. Typically Warli paintings are simply painted on mud, charcoal and cow dung treated surfaces with rice paste for white color.
Shapes in Warli art-


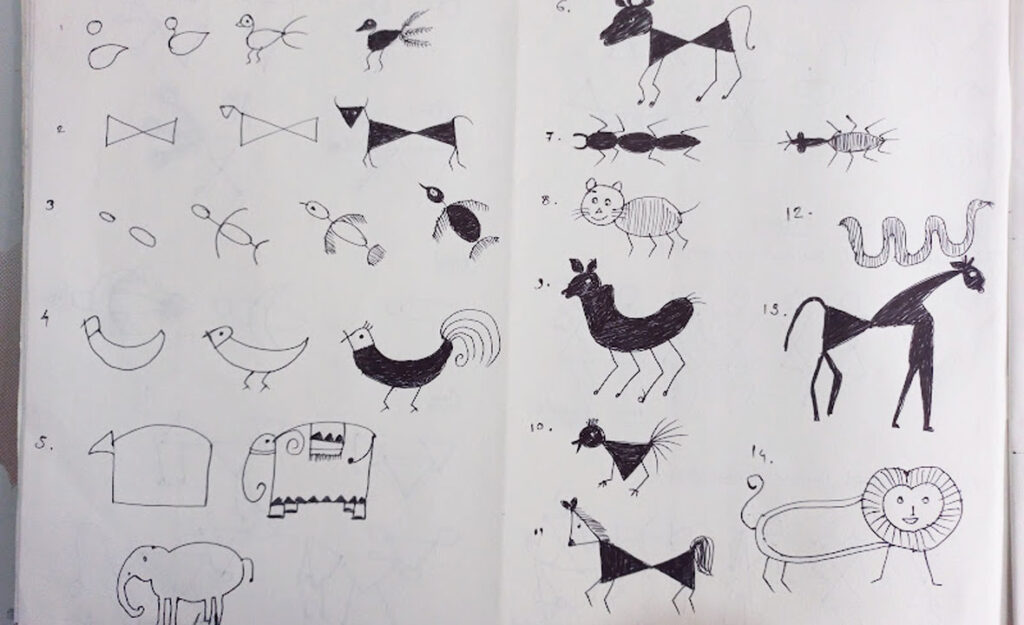
How to draw animals in Warli art-

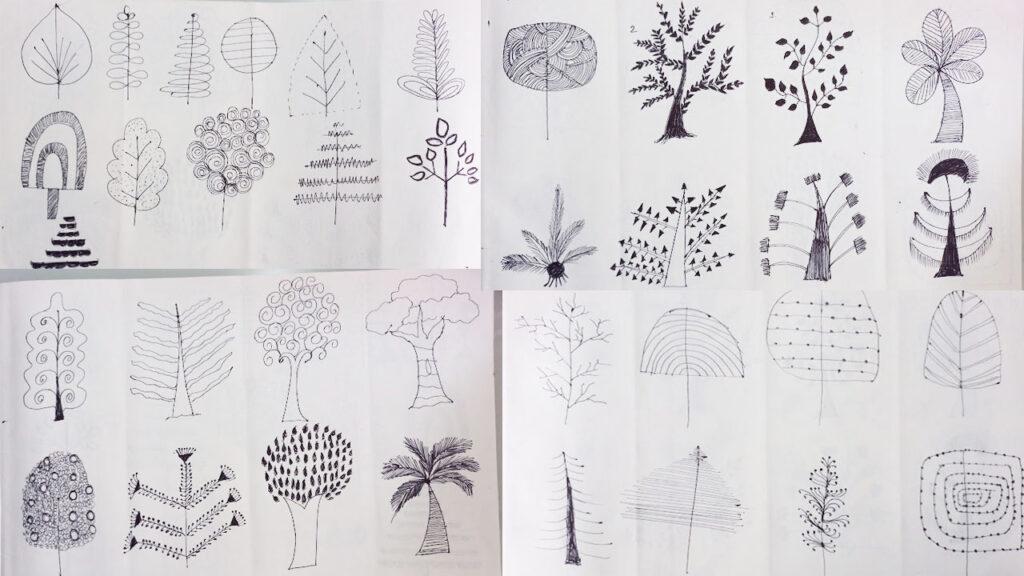
How to draw trees in Warli art-

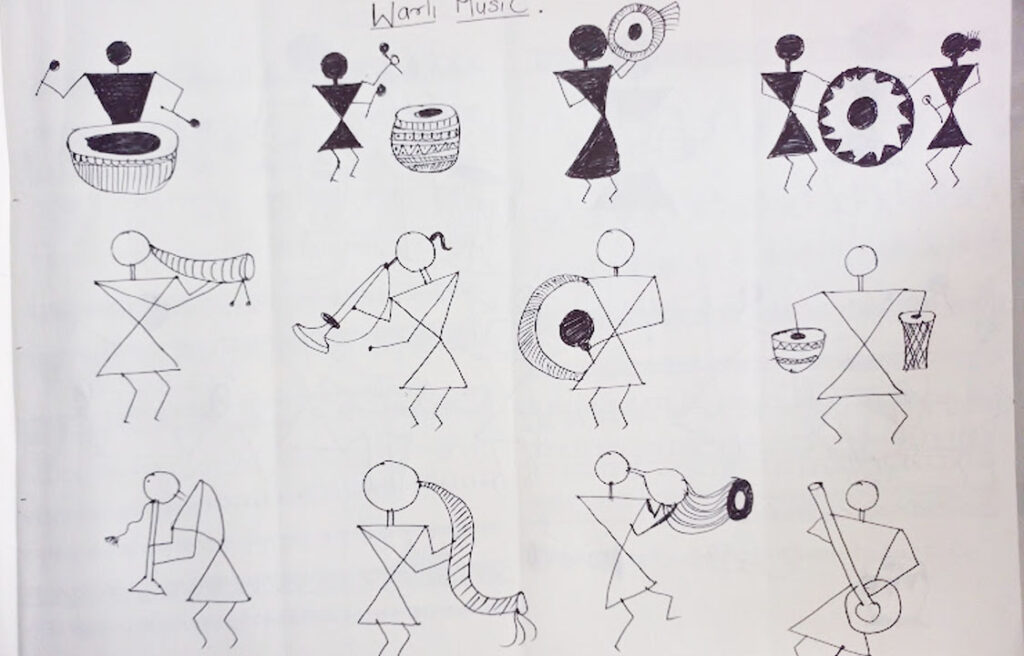
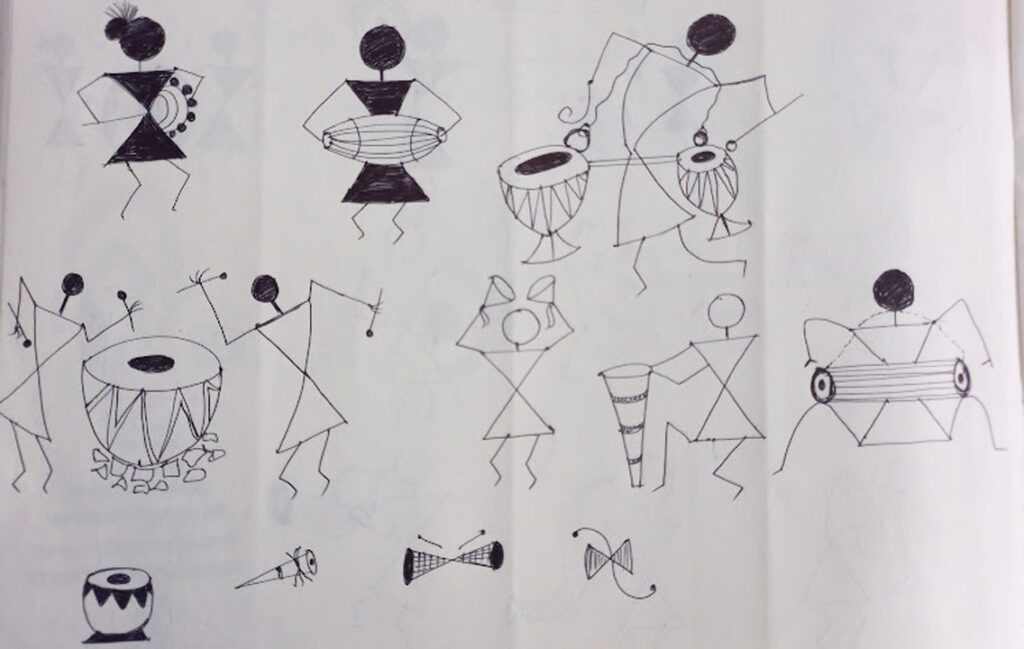
Music in Warli art-


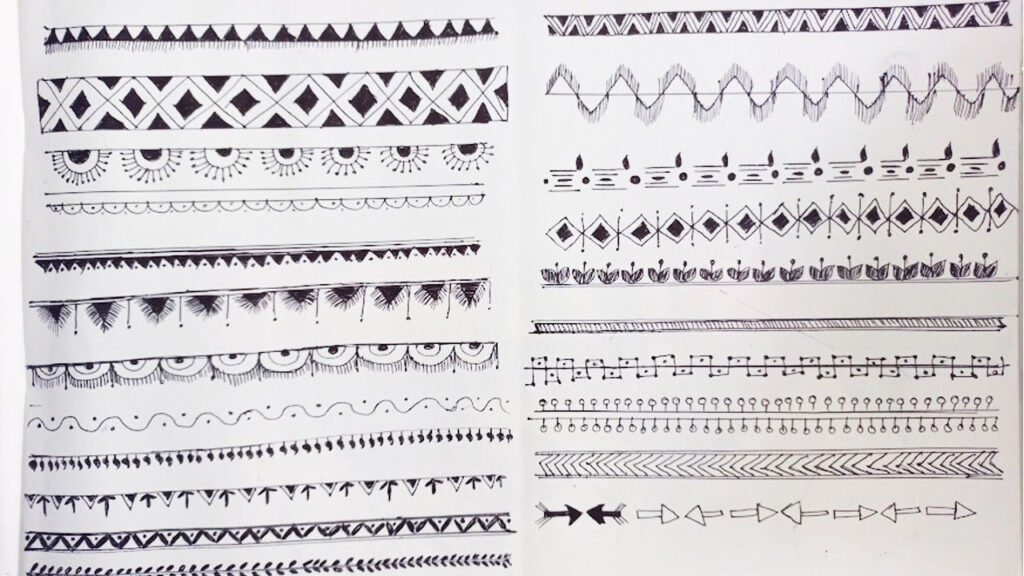
Borders in Warli art-
This is all about Warli art. Now let’s move to the tutorial on how I have made these beautiful wall frames. The list of material is given below, that is easily available in the market.
Material used:
- Cardboard box
- Plaster of paris
- Fevicol
- Wall putty(White cement)
- Acrylic colors
- Foil paper.
Step 1:
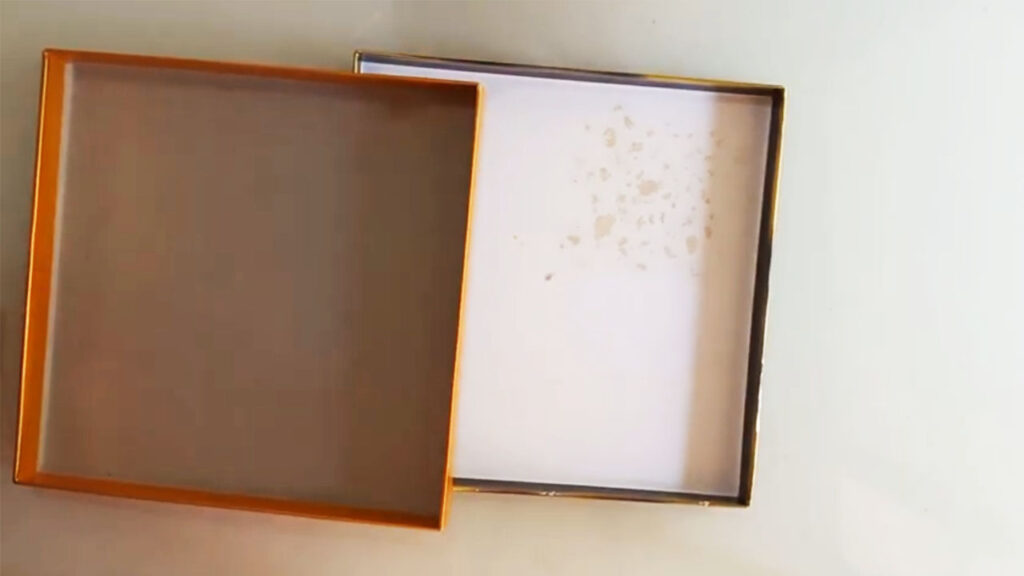
I love to recycle things into beautiful decors so that I have used an empty dry fruit box to make these frames. You can use square shape MDF board also. They are easily available online.
Step 2:
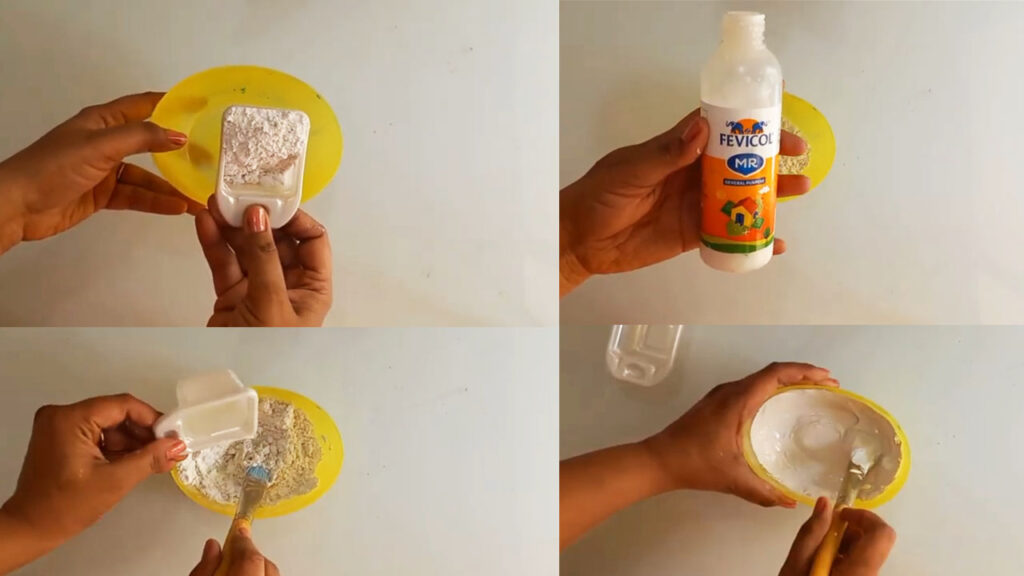
The dry fruit boxes I took were strong but need to be enduring after painting. To make the base strong and durable we need to apply the plaster of Paris paste on the base.
Why we use plaster of Paris on base?
Plaster dries quickly, so you can get on with painting and finishing the project. Plaster of Paris is a building material that is used as a protective coating on walls and ceilings and it can be used in craft project to make the base strong. It is also used as a molding and casting means for decorative elements. It is used to give artistic finishing touches to the buildings.
To make texture paste I took 3 ingredients- 1 t-spoon plaster of Paris, 1 t-spoon fevicol and a small quantity of water. Mix all the ingredients nicely to form proper consistency. Applying texture paste will make your base strong.
Step 3:
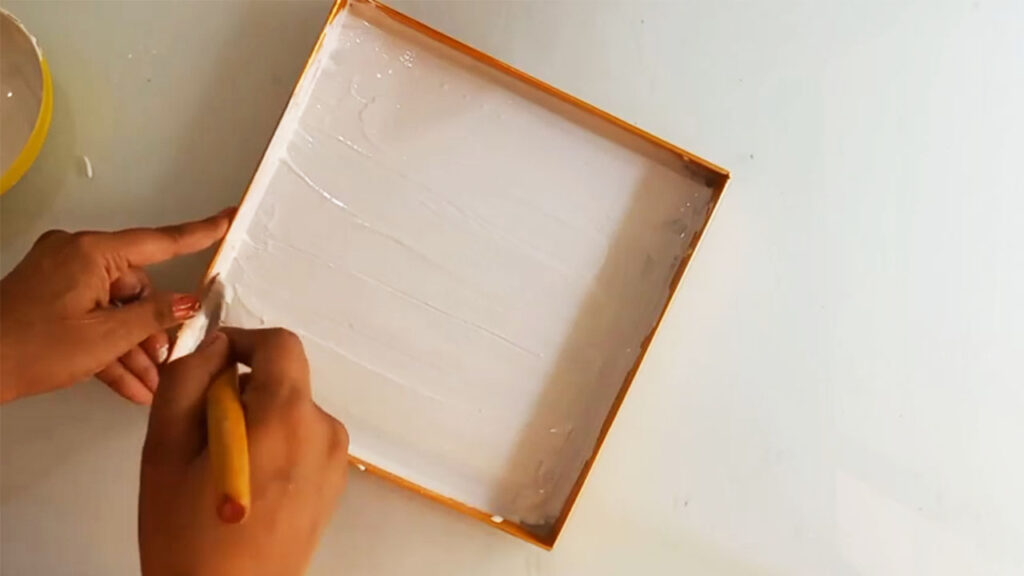
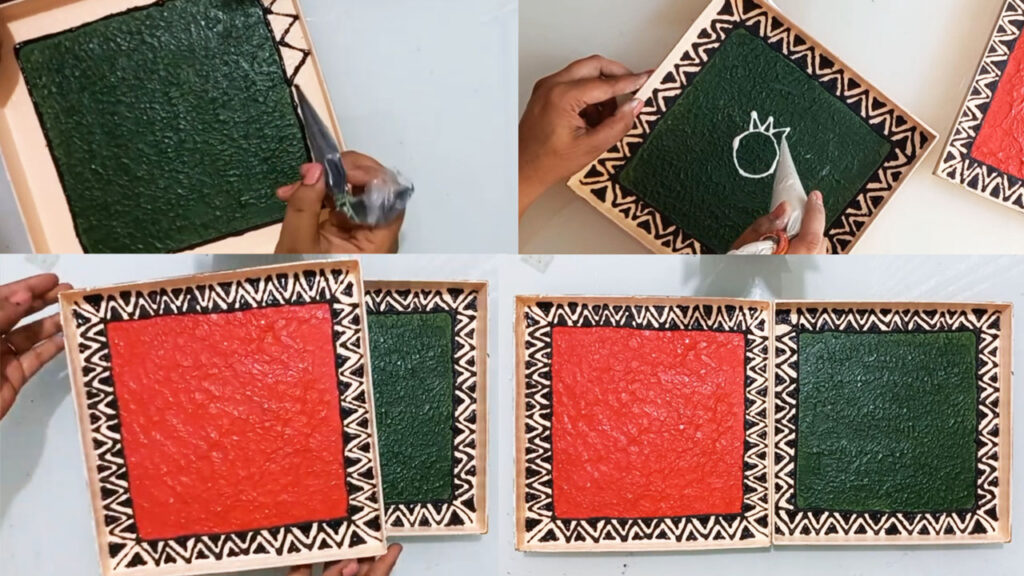
Apply texture paste on both the cardboards. Use flat brush to apply the paste. Make sure you have applied the paste uniformly.
Step 4:
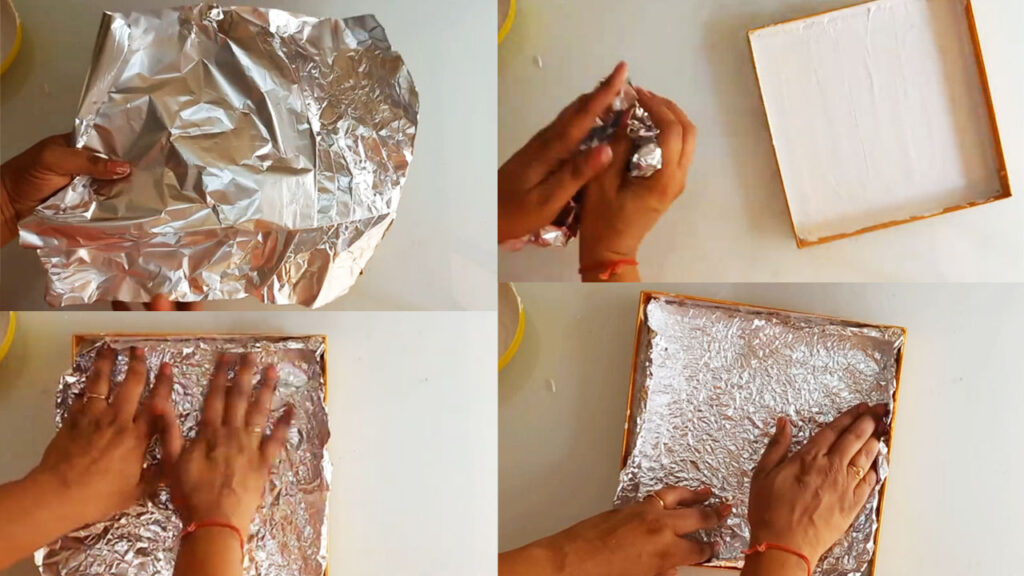
Now the interesting part is making texture or pattern on the base. There can be so many things around you that you haven’t even noticed with you can make texture or pattern. I have used foil paper to make texture designs on cardboards you can use polythene, fork or any other thing to make texture.
Let’s see how I used foil paper to make texture. Take foil paper of cardboard size, crush it and paste it on texture paste. Remember plaster of paris dries easily, so this procedure you need to do before texture paste dries. Leave the foil paper for 10 min and then remove it. It looks really beautiful.
Step 5:
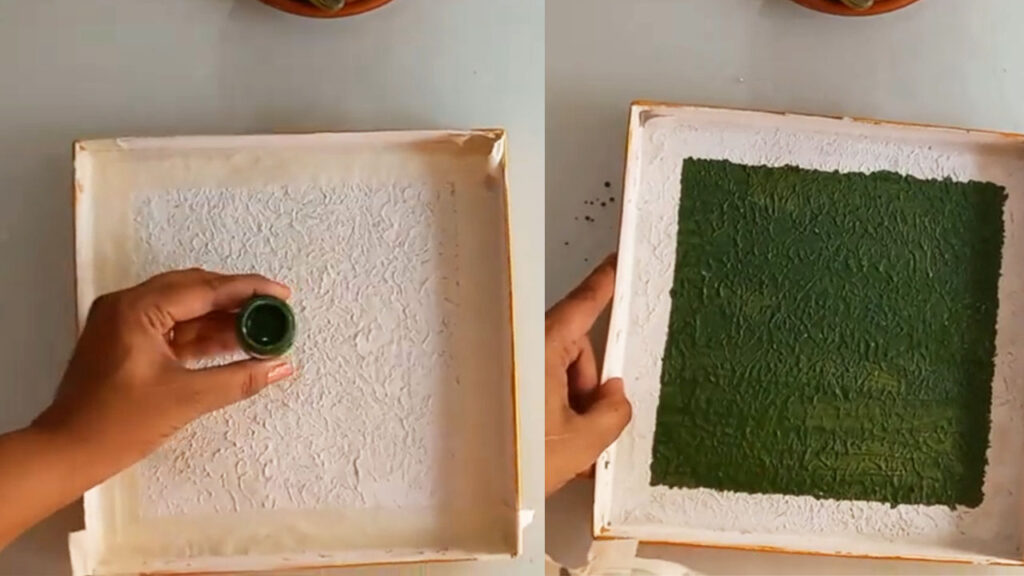
Choosing background color is completely your choice. But remember in warli art only Henna, indigo, earthy mud, brick red are the only colors that can be used as a background color. I chose green and red color for the background.
Step 6:
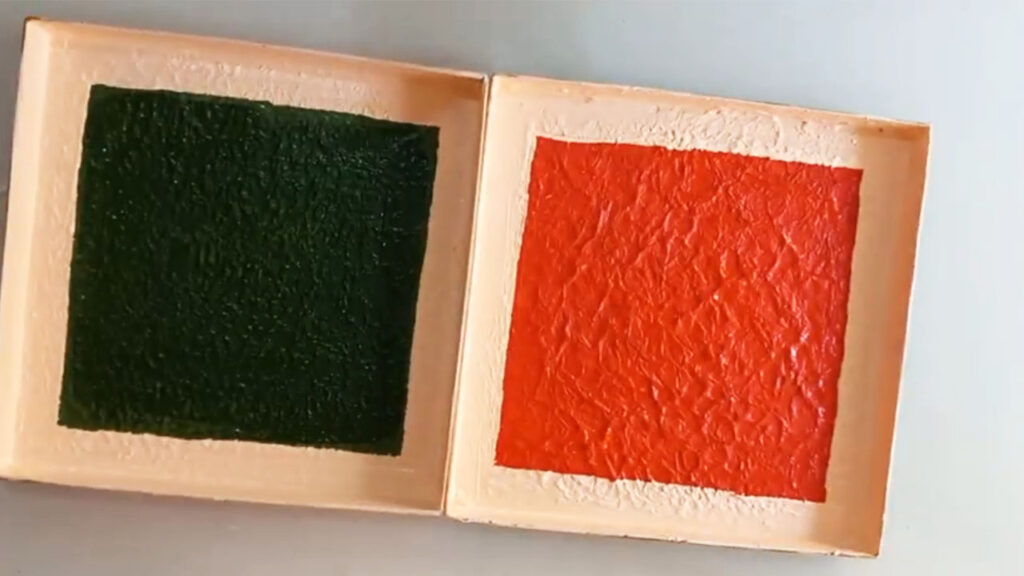
I chose green and red color for the background.
Step 7::
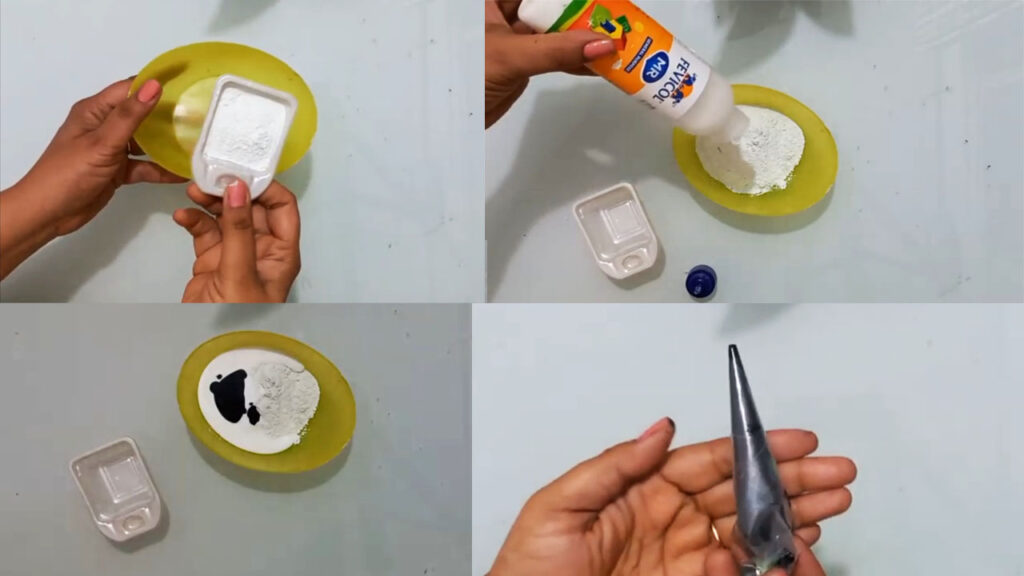
Now the important part is to make a cone for painting. I have used 3 ingredients to make painting cone- Wall putty(white cement), Fevicol and acrylic color. Take wall putty and fevicol in equal quantities. Do not add water in to it. The paste should be thick. You can add any acrylic color as per your choice. Mix all the ingredients nicely. Make a cone from plastic paper and fill it with paste. You can’t store it for more days because the wall putty dries easily.
Step 8:
Start drawing the borders. There are many designs of borders in warli art, you can choose as per your choice.
Step 9:
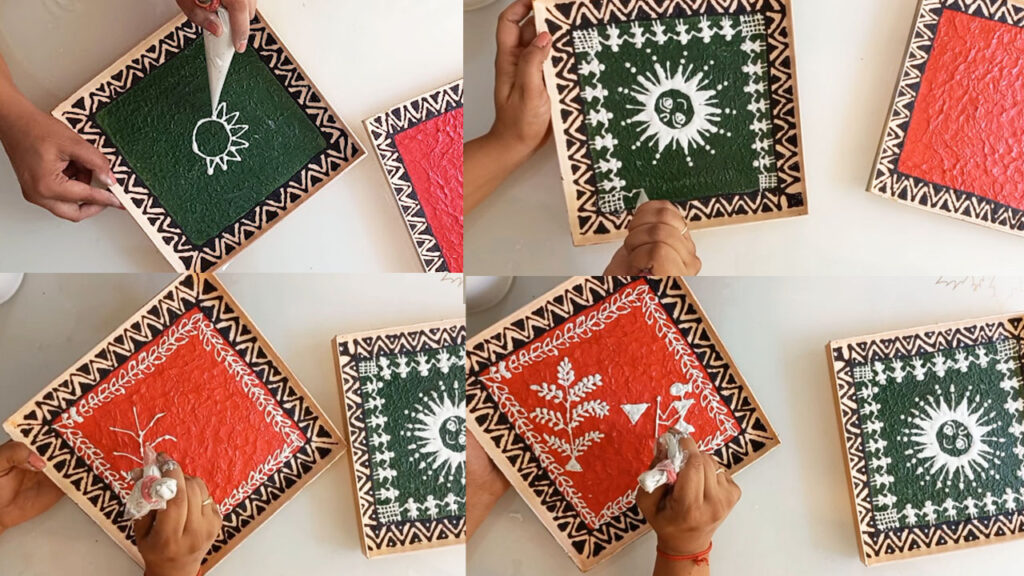
To draw warli art I have used white color painting cone.
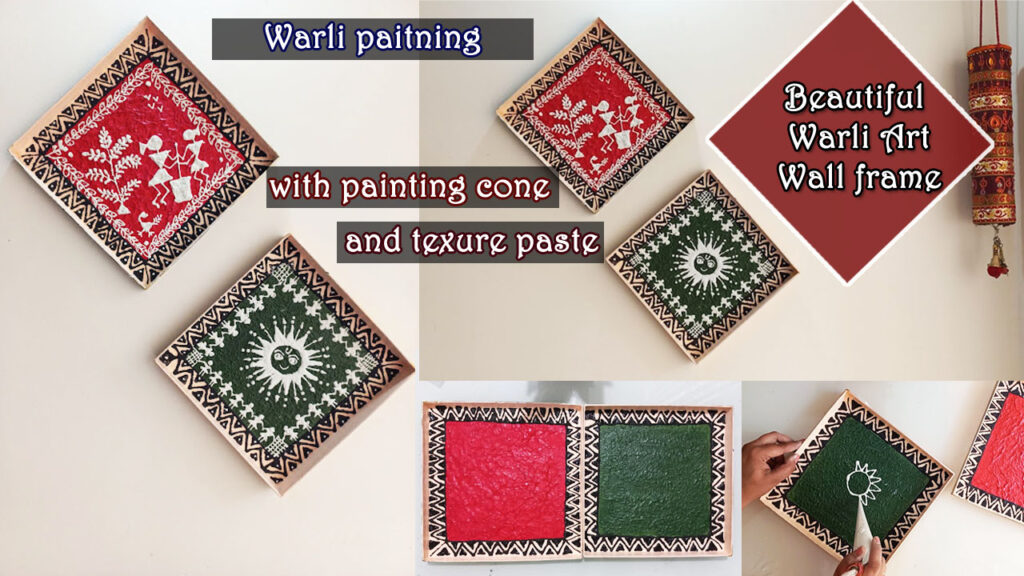
I hope you like these Warli art wall frames. I have explained to you how to make it in very easy steps. Thank you for reading this article. Let me know your reviews through the comment box.
Thank you!
Watch complete tutorial

Other Indian art you may like


Everything is very open with a very clear clarification of the challenges. It was truly informative. Your website is very useful. Thank you for sharing!} {visit link|visit my webpage|visit here|visit|visit my website|visit our website|visit my web site|visit my website|Visit %domain_as_name%|visit my website
thank you so much
Hi all. My wife and I are really glad to have found the articles here. I’ve been scouring for this info since last spring and I will be encouraging my followers to drop by. The other morning I was toggling through the google searches trying to determine the answers to my tough questions. Now I am definately to take things higher in whatever avenues I can. We are getting all blurred out on the varied advice we are observing. Moreover, I just needed to thank you tremendously for such solid answers. This has propelled me out of an old rut. Many bittersweet knowings are gaining momentum my world. Its really a good website to make new relationships. I’d also add that I am investigating. when you get a chance, check out my newly created Blog:[url=https://staceyleephotography.net/aubrey-annapolis-maryland-senior-portrait-photography/]glen ellen farm wedding[/url]
Thank you so much
It is in point of fact a nice and useful piece of info.
I am satisfied that you simply shared this useful info with us.
Please keep us up to date like this. Thank you for sharing.
This site was… how do you say it? Relevant!!
Finally I have found something that helped me.
Thanks a lot!
Very very beautiful article.. I will definitely try making this craft
thanks